VSCode Extension
We developed a VSCode extension for Clearblue to provides a user-friendly interface, making it an ideal choice for beginners.
Prerequisites
Before you start installing Clearblue VSCode Extension, make sure your system meets the following requirements:
- Operating System: Linux
- Memory: 16GB or more
Installation
Clearblue VSCode extension supports two installation methods.
- Web IDE: Install with Docker (Recommended)
- Local IDE: Install with Local Extension
Install with Docker
To mitigate potential environment compatibility issues, we recommend utilizing the Clearblue WebIDE with Docker for project management in addition to local installation, as it integrates with Code Server and simplifies remote development.
Before proceeding, ensure that Docker is installed on your system (version 23.0.0 or higher).
Installation
To install Clearblue WebIDE with Docker, follow these steps:
- Pull the latest image from container registry.
docker pull prismers/clearblue-image:latest
- Start Code Server and listening to 0.0.0.0:8080 on host machine.
docker run -d --name cbvis -p 8080:8080 prismers/clearblue-image
- Open your browser and visit http://127.0.0.1:8080. And now, you are free to have a try with Clearblue WebIDE.
Initialization
Docker users can skip this section as everything is set already.
Tips for docker users Code Server supports drag-and-drop file uploading. Alternatively, you can use
docker cp. However, please note that file permissions may not be preserved, which could cause issues with Clearblue WebIDE’s scan-binary feature. To avoid this, it’s recommend to upload files as .tar.
Update
To take advantage of the latest features, it’s essential to regularly update the artifacts and Docker image. Make sure to check for updates periodically and carry out the necessary update process.
Update Clearblue Components
In most cases, you can update Clearblue components, including the binaries cb-check and plankton-dasm, the cbvis extension, and checker headers, simply by using the update.sh script within the container.
Here are the steps to follow:
Open your terminal or command prompt.
Access the container by executing the following command:
docker exec -it <your container id> /bin/bashThis command allows you to enter the container’s shell.
Once inside the container, you can update the artifacts by running:
update.shThis script will ensure that the necessary components are updated within the container.
Finally, to ensure a successful update, refresh the WebIDE by pressing
command/ctrl + Ron the WebIDE interface.
Update Docker Image
If you need to update the entire Docker image to the latest version, please follow the steps below.
Stop and remove the current container.
Warning: Any changes made within the original container will be lost during this update.
docker stop <your container id>
docker rm <your container id>
Update the Docker image by running the following command:
docker pull prismers/clearblue-image:latestThis command will fetch the latest version of the Docker image named “prismers/clearblue-image”.
Restart Code Server and listening to 0.0.0.0:8080 on host machine.
docker run -d --name cbvis -p 8080:8080 prismers/clearblue-image:latestFollow the steps in Update Components section to update the components in the container.
Install with Local Extension
To utilize the local Clearblue Extension with VSCode, ensure that you have VSCode (version 1.68.0 or higher) and Clearblue (version 1.0.0 or higher) installed. For an enhanced experience, we also recommend the installation of the C/C++ for VS Code Extension.
Please note, the local extension currently does not support advanced development. If you wish to develop a custom checker, we recommend installing Clearblue with Docker.
Installation
To install the Clearblue Extension on local VSCode, follow these steps:
- Download the latest Clearblue Extension.
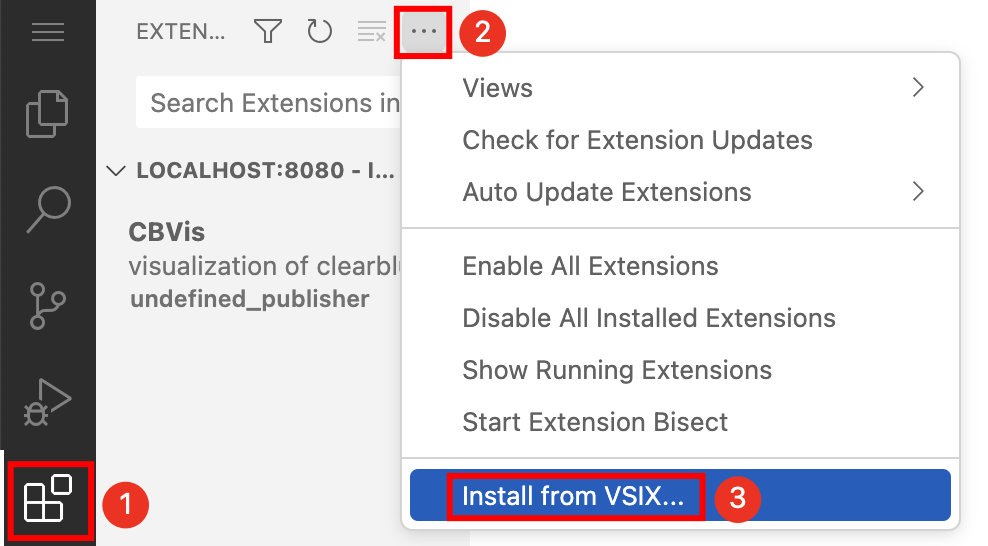
- Open VS Code and go to the extensions view (Ctrl+Shift+X).
- Click
...from the top right panel and select “install from vsix”.
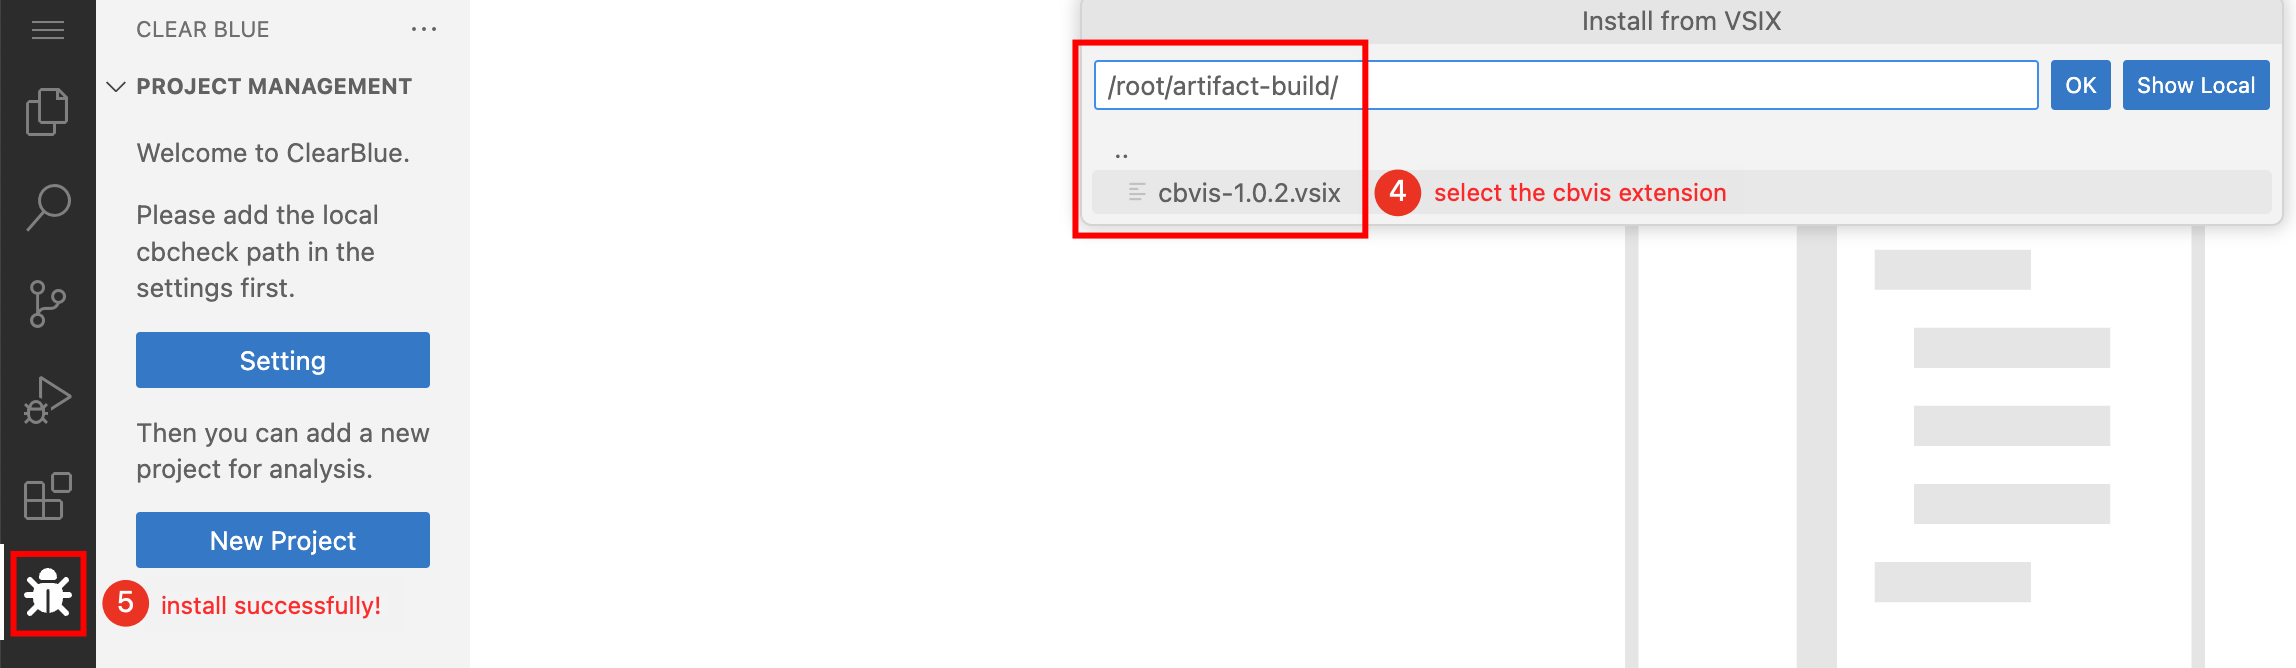
- Choose the extension file, such as
cbvis-1.0.2.vsix. - Once a little bug icon appears, the installation is successful. Click the icon to enter the main view.
Initialization
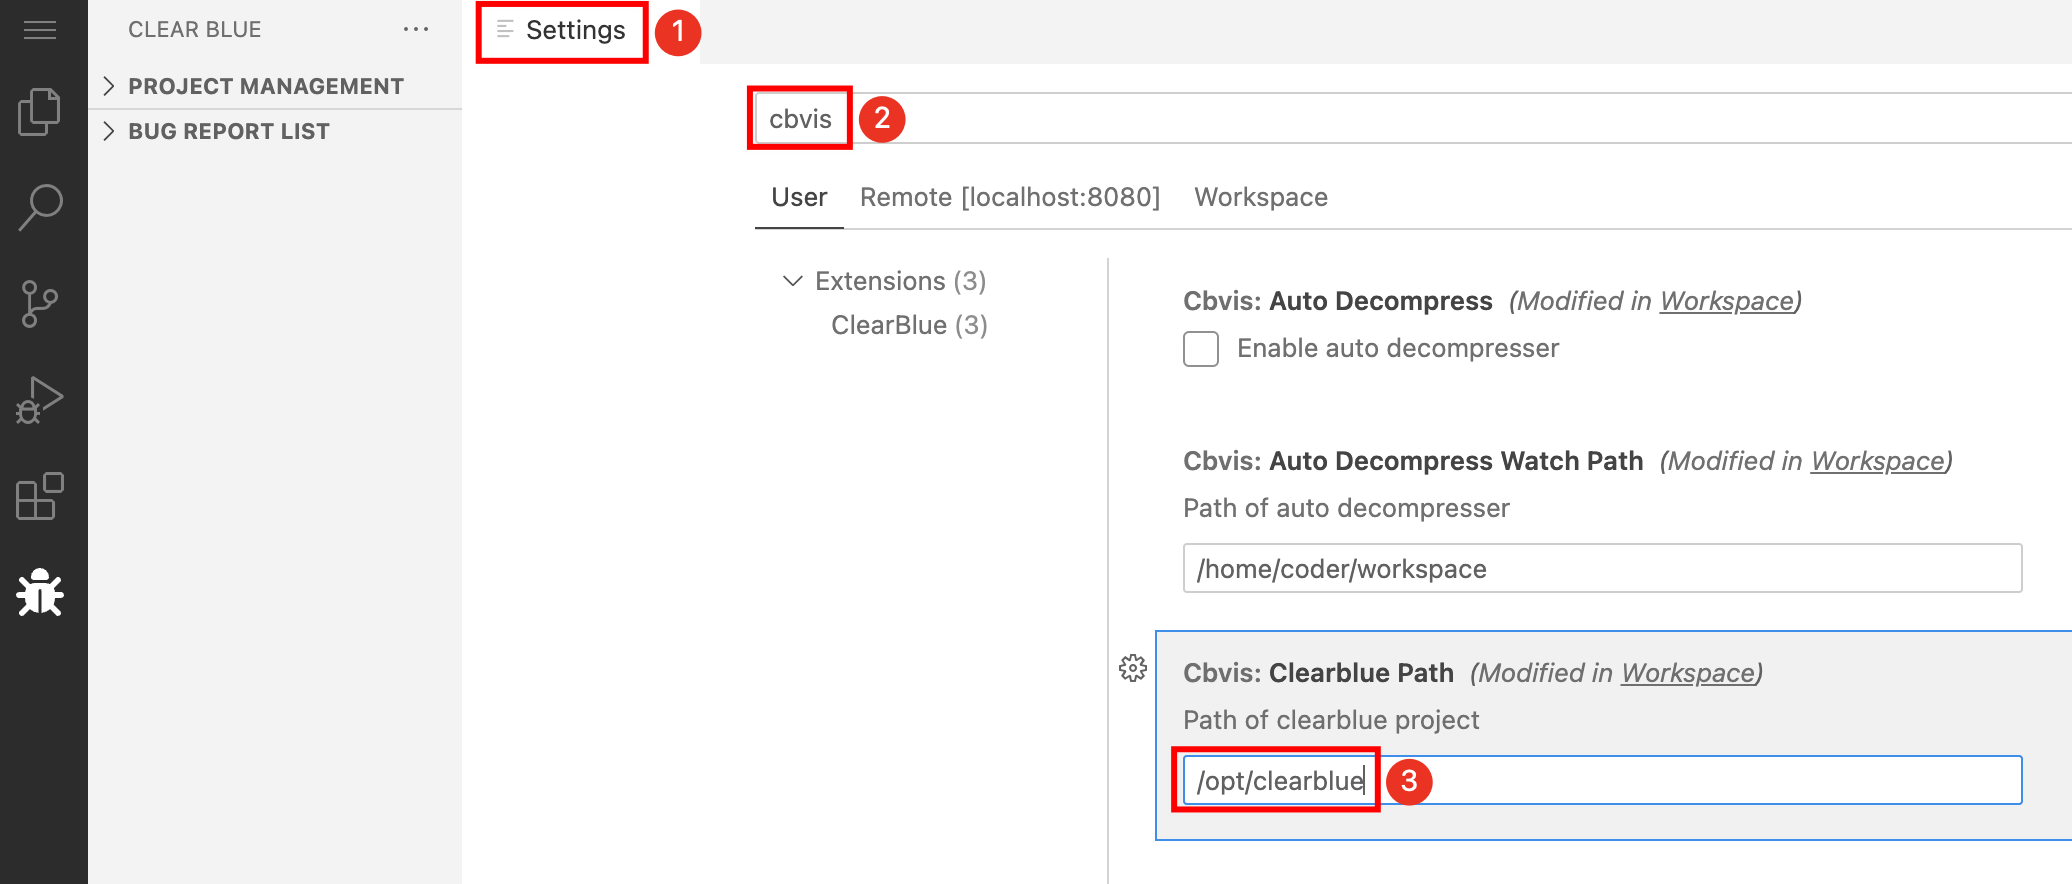
For users who have installed Clearblue as a local VSCode Extension, you will need to specify the local Clearblue cbcheck path in the extension settings. Follow these steps:
- Open the VSCode Settings page by pressing
Ctrl/Command+,. - Enter
cbvisto access the Clearblue extension settings. - Set the Path of the Clearblue project. This should be the path where you have downloaded
cbcheckandplankton-dasm.
Usage
This section provides an overview of how to use Clearblue VSCode Extension to manage projects.
Preparing Project
Binary files (ELF, ARM, ARM64, Mach-O) are the input of Clearblue. Users need to build the project and produce binaries with debug information first.
Using the GNU file tool can help determine if you have produced the required binary format:
file /path/to/binary ELF 64-bit LSB pie executable,x86-64,version 1 (SYSV),dynamically linked,interpreter /lib64/ld-linux-x86-64.so.2,for GNU/Linux 4.4.0,with debug_info,not stripped
If you are on a Linux device,the correct strings should include the binary format ELF and with debug info.
Managing Projects
With Clearblue WebIDE, you can add, delete, and update projects as needed. Project information is saved in the workspace, so projects persist even after restarting Visual Studio Code.
Adding New Projects
To create a new project, either click the New Project button on the welcome page or click the Add icon next to the project manage view.
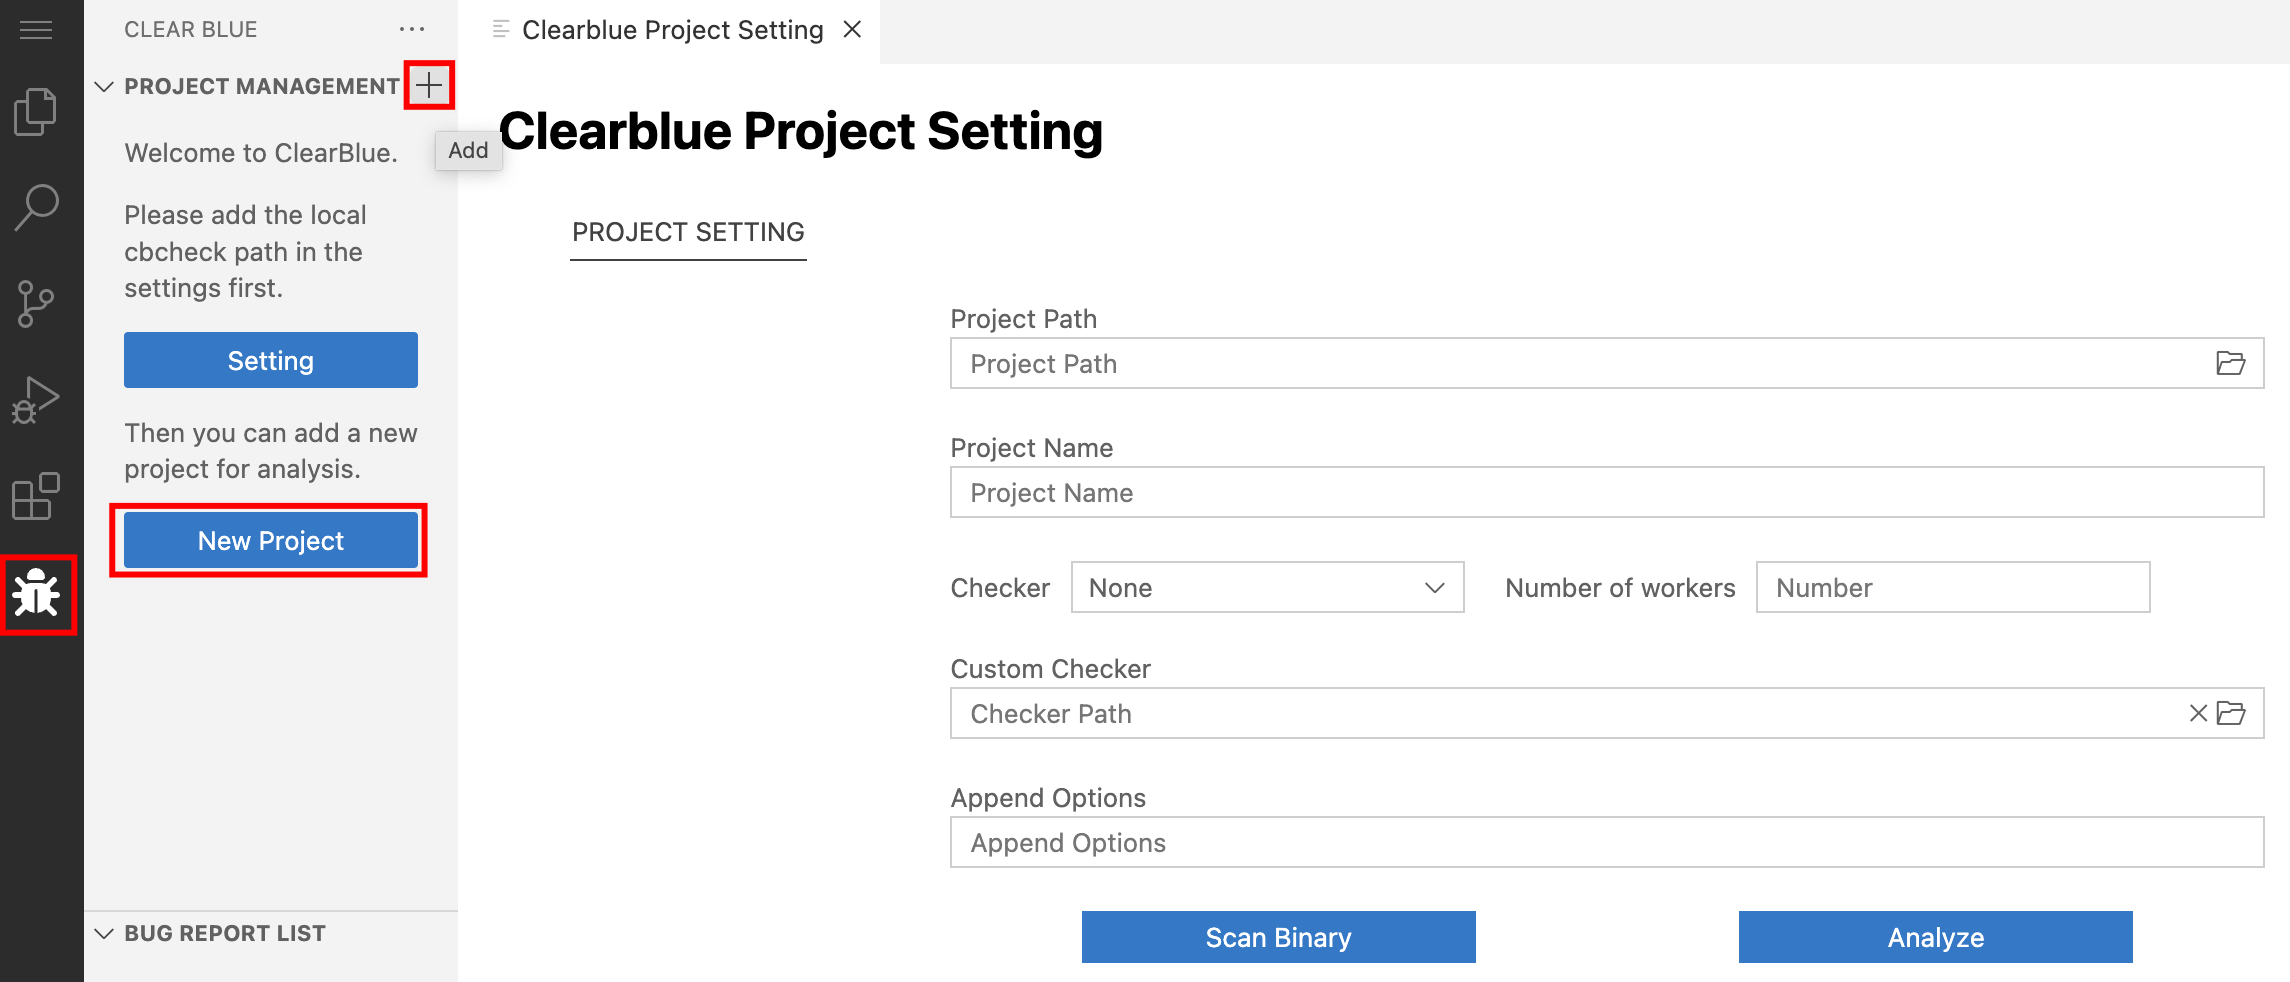
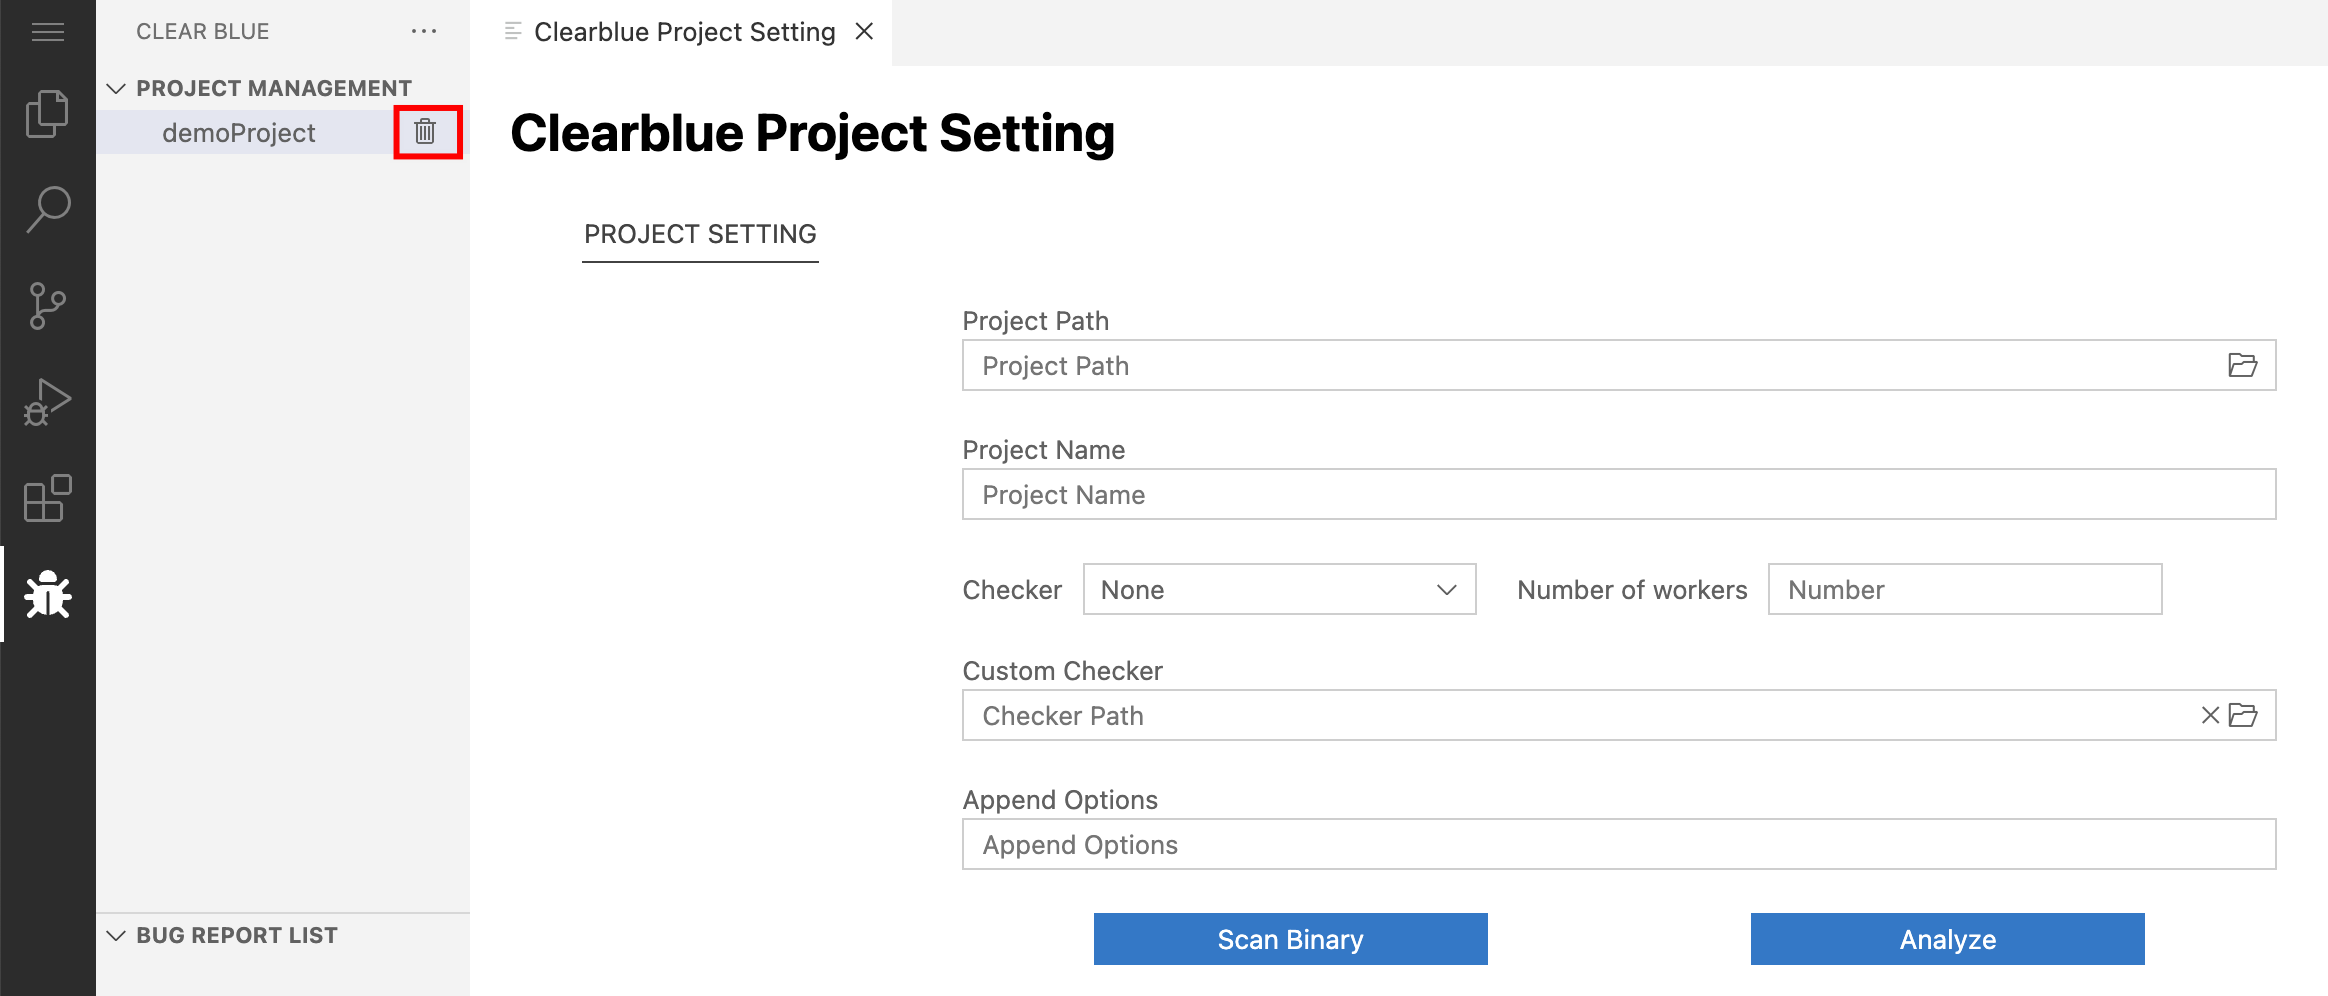
This will take you to the New Project Page, where you’ll need to fill out several input fields:
- Project Path: The location of the folder where the project is stored.
- Project Name: The name of the project.
- Checker: Choose a built-in checker to use for the project.
- Number of Workers: Specify how many workers to use for CbCheck.
- Custom Checker: Load custom checkers if needed.
- Append Options: Specify any additional Cbcheck options. The default value is -ps-stable, but you can change this if necessary. This field is optional.
You must provide a value for Project Path to create a new project. Click the icon on the right of the input field to select the corresponding file or folder.
Deleting Projects
To delete a project, simply click the Delete icon next to the project in the left view.
After creating a project, the project will be displayed in the left view. Click the delete icon to delete the project.
Saving Projects
To modify project information, click the project item in the Project Manage view to enter the project manage page.
From there, you can make changes to the project information as needed, using the same input fields as the Adding New Projects section.
Once you’ve made your changes, the project information will be automatically saved.
Run Clearblue
To use Clearblue with Clearblue VSCode Extension, you’ll need to follow two steps.
Scan
Click the ‘Scan’ button to scan for binaries with debug information within the specified project path.
The scanned binaries with debug information will then be displayed in the list.
Analyze
Select the binaries you wish to analyze, then click the ‘Analyze’ button. This will initiate the analysis process using Clearblue.
For information on how to select checkers and append options, please refer to the section titled Adding New Projects.
Tips for large programs
Checking a large program with Clearblue VSCode Extension can take several hours.
To save time, you can close the Clearblue WebIDE or Visual Studio Code window after seeing the message “project updated successfully” following any button press.
You can then do other tasks or take a break. When you come back, the status and progress of the program check will be restored.
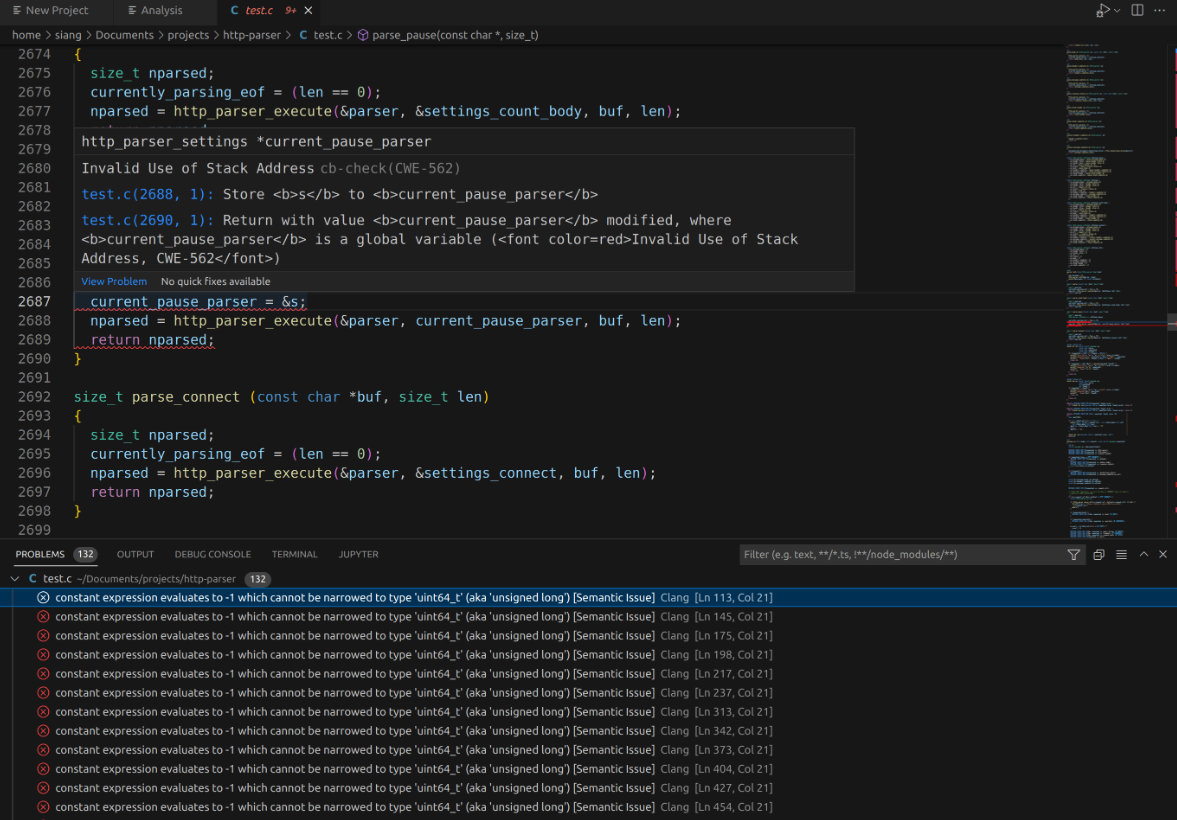
Diagnostics
If any bugs are found in the bitcode files, they will be displayed as diagnostics in the corresponding line of the relevant file. You can easily navigate to the relevant code sections by using the floating window of diagnosis and PROBLEMS.
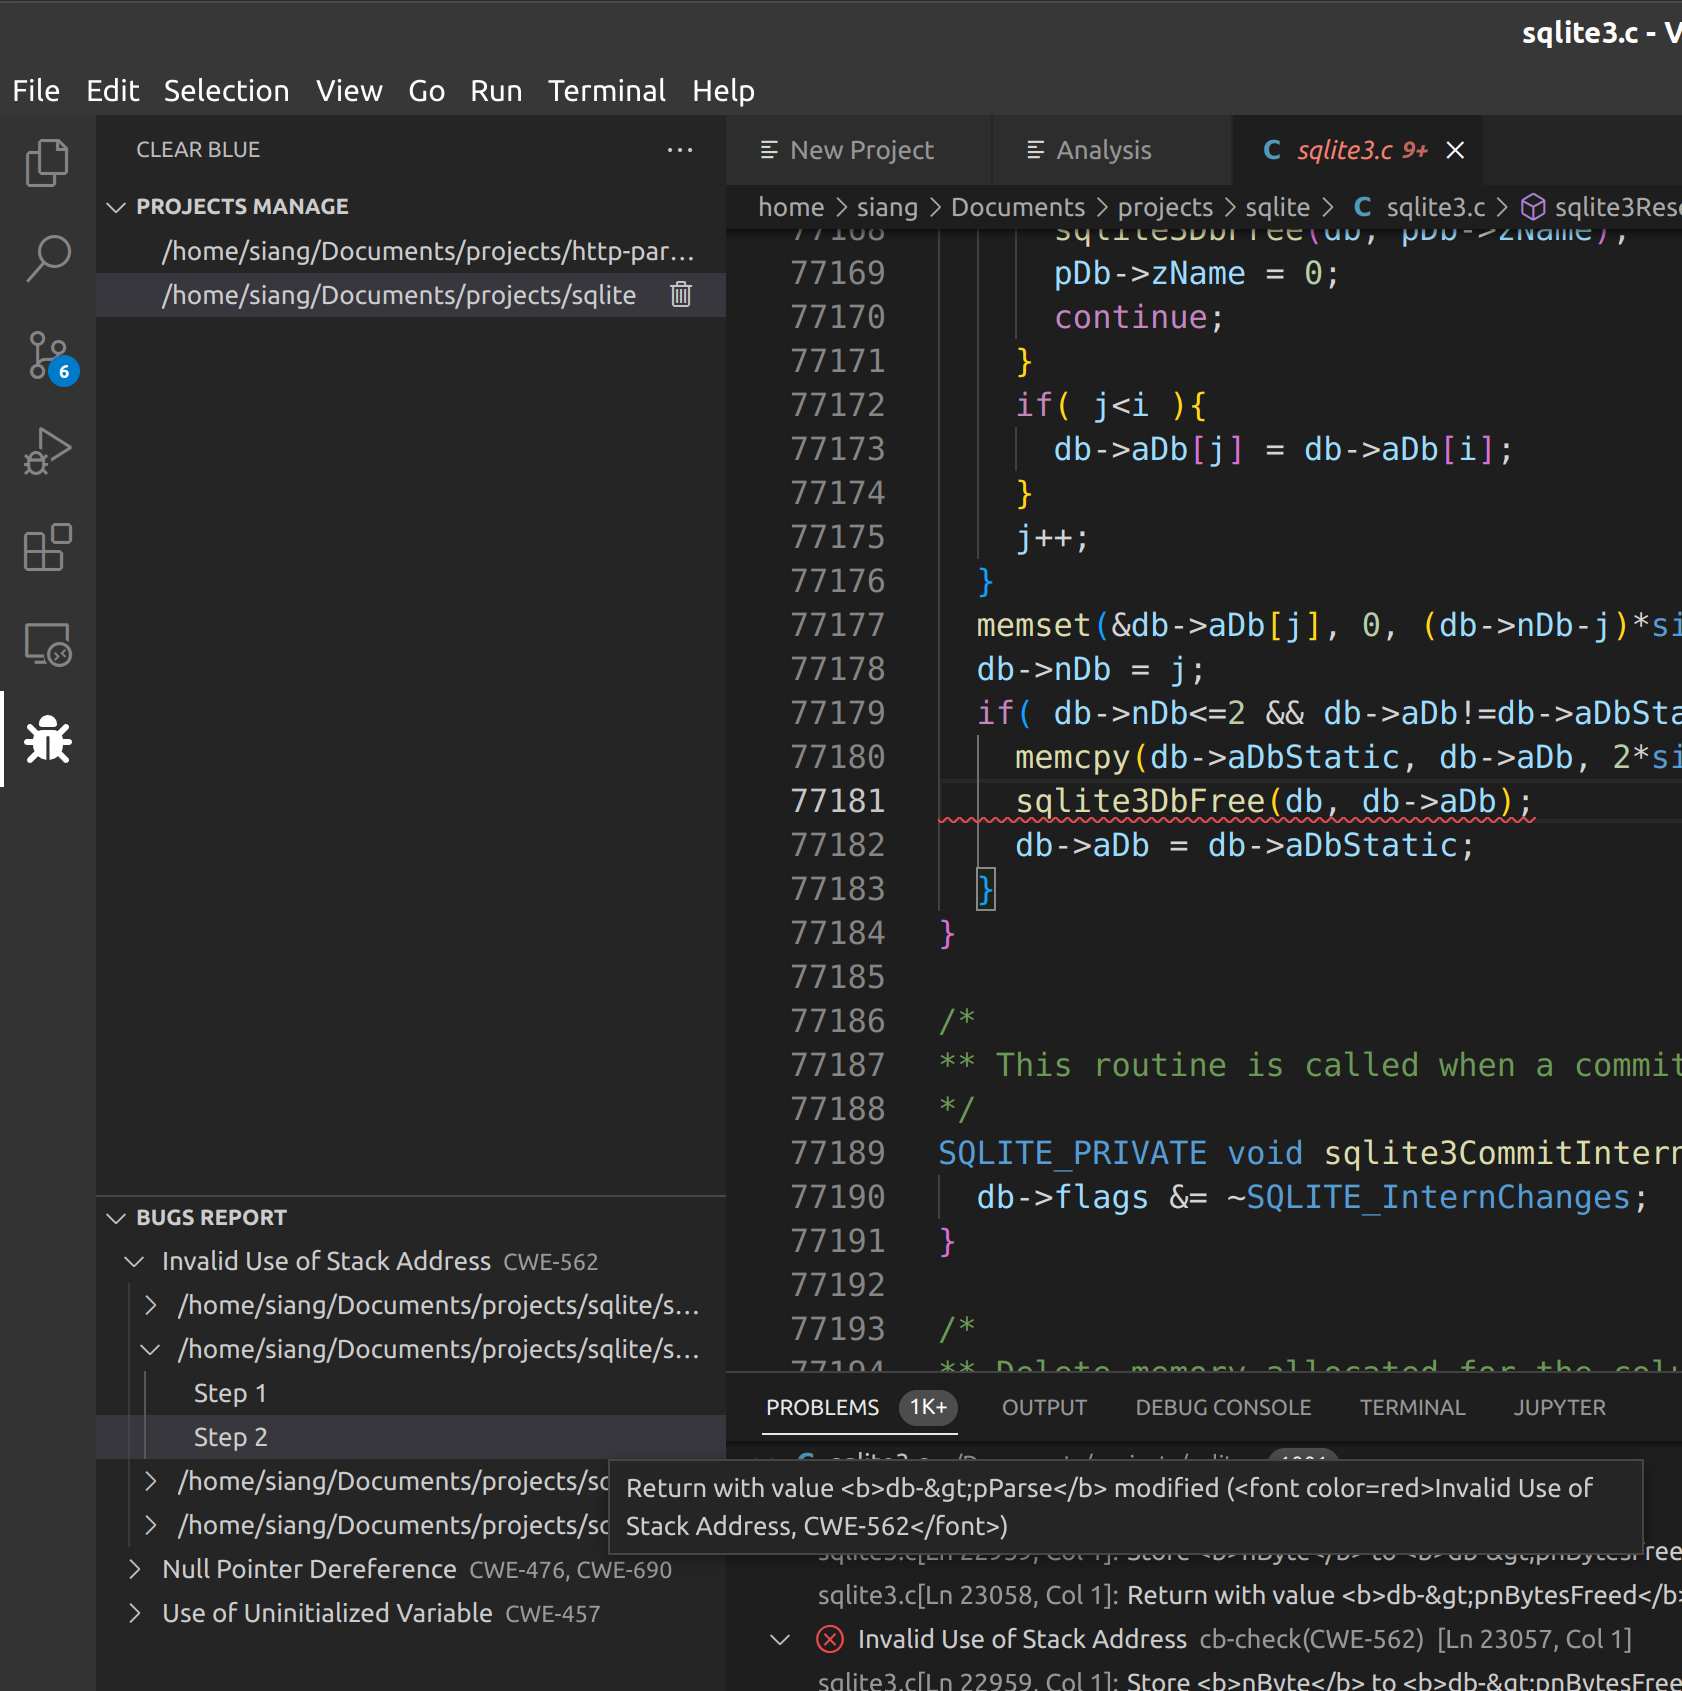
Bugs Treeview
After the analysis of the report is complete in Clearblue WebIDE, the Bugs Report on the left-hand side will display a treeview. The first layer of the treeview indicates the type of bugs identified, while the second layer shows the location of the bugs. Finally, the third layer displays the step where the bugs occurred. You can click on the third layer to navigate to the corresponding line of code in the relevant file and see more details of the bug.
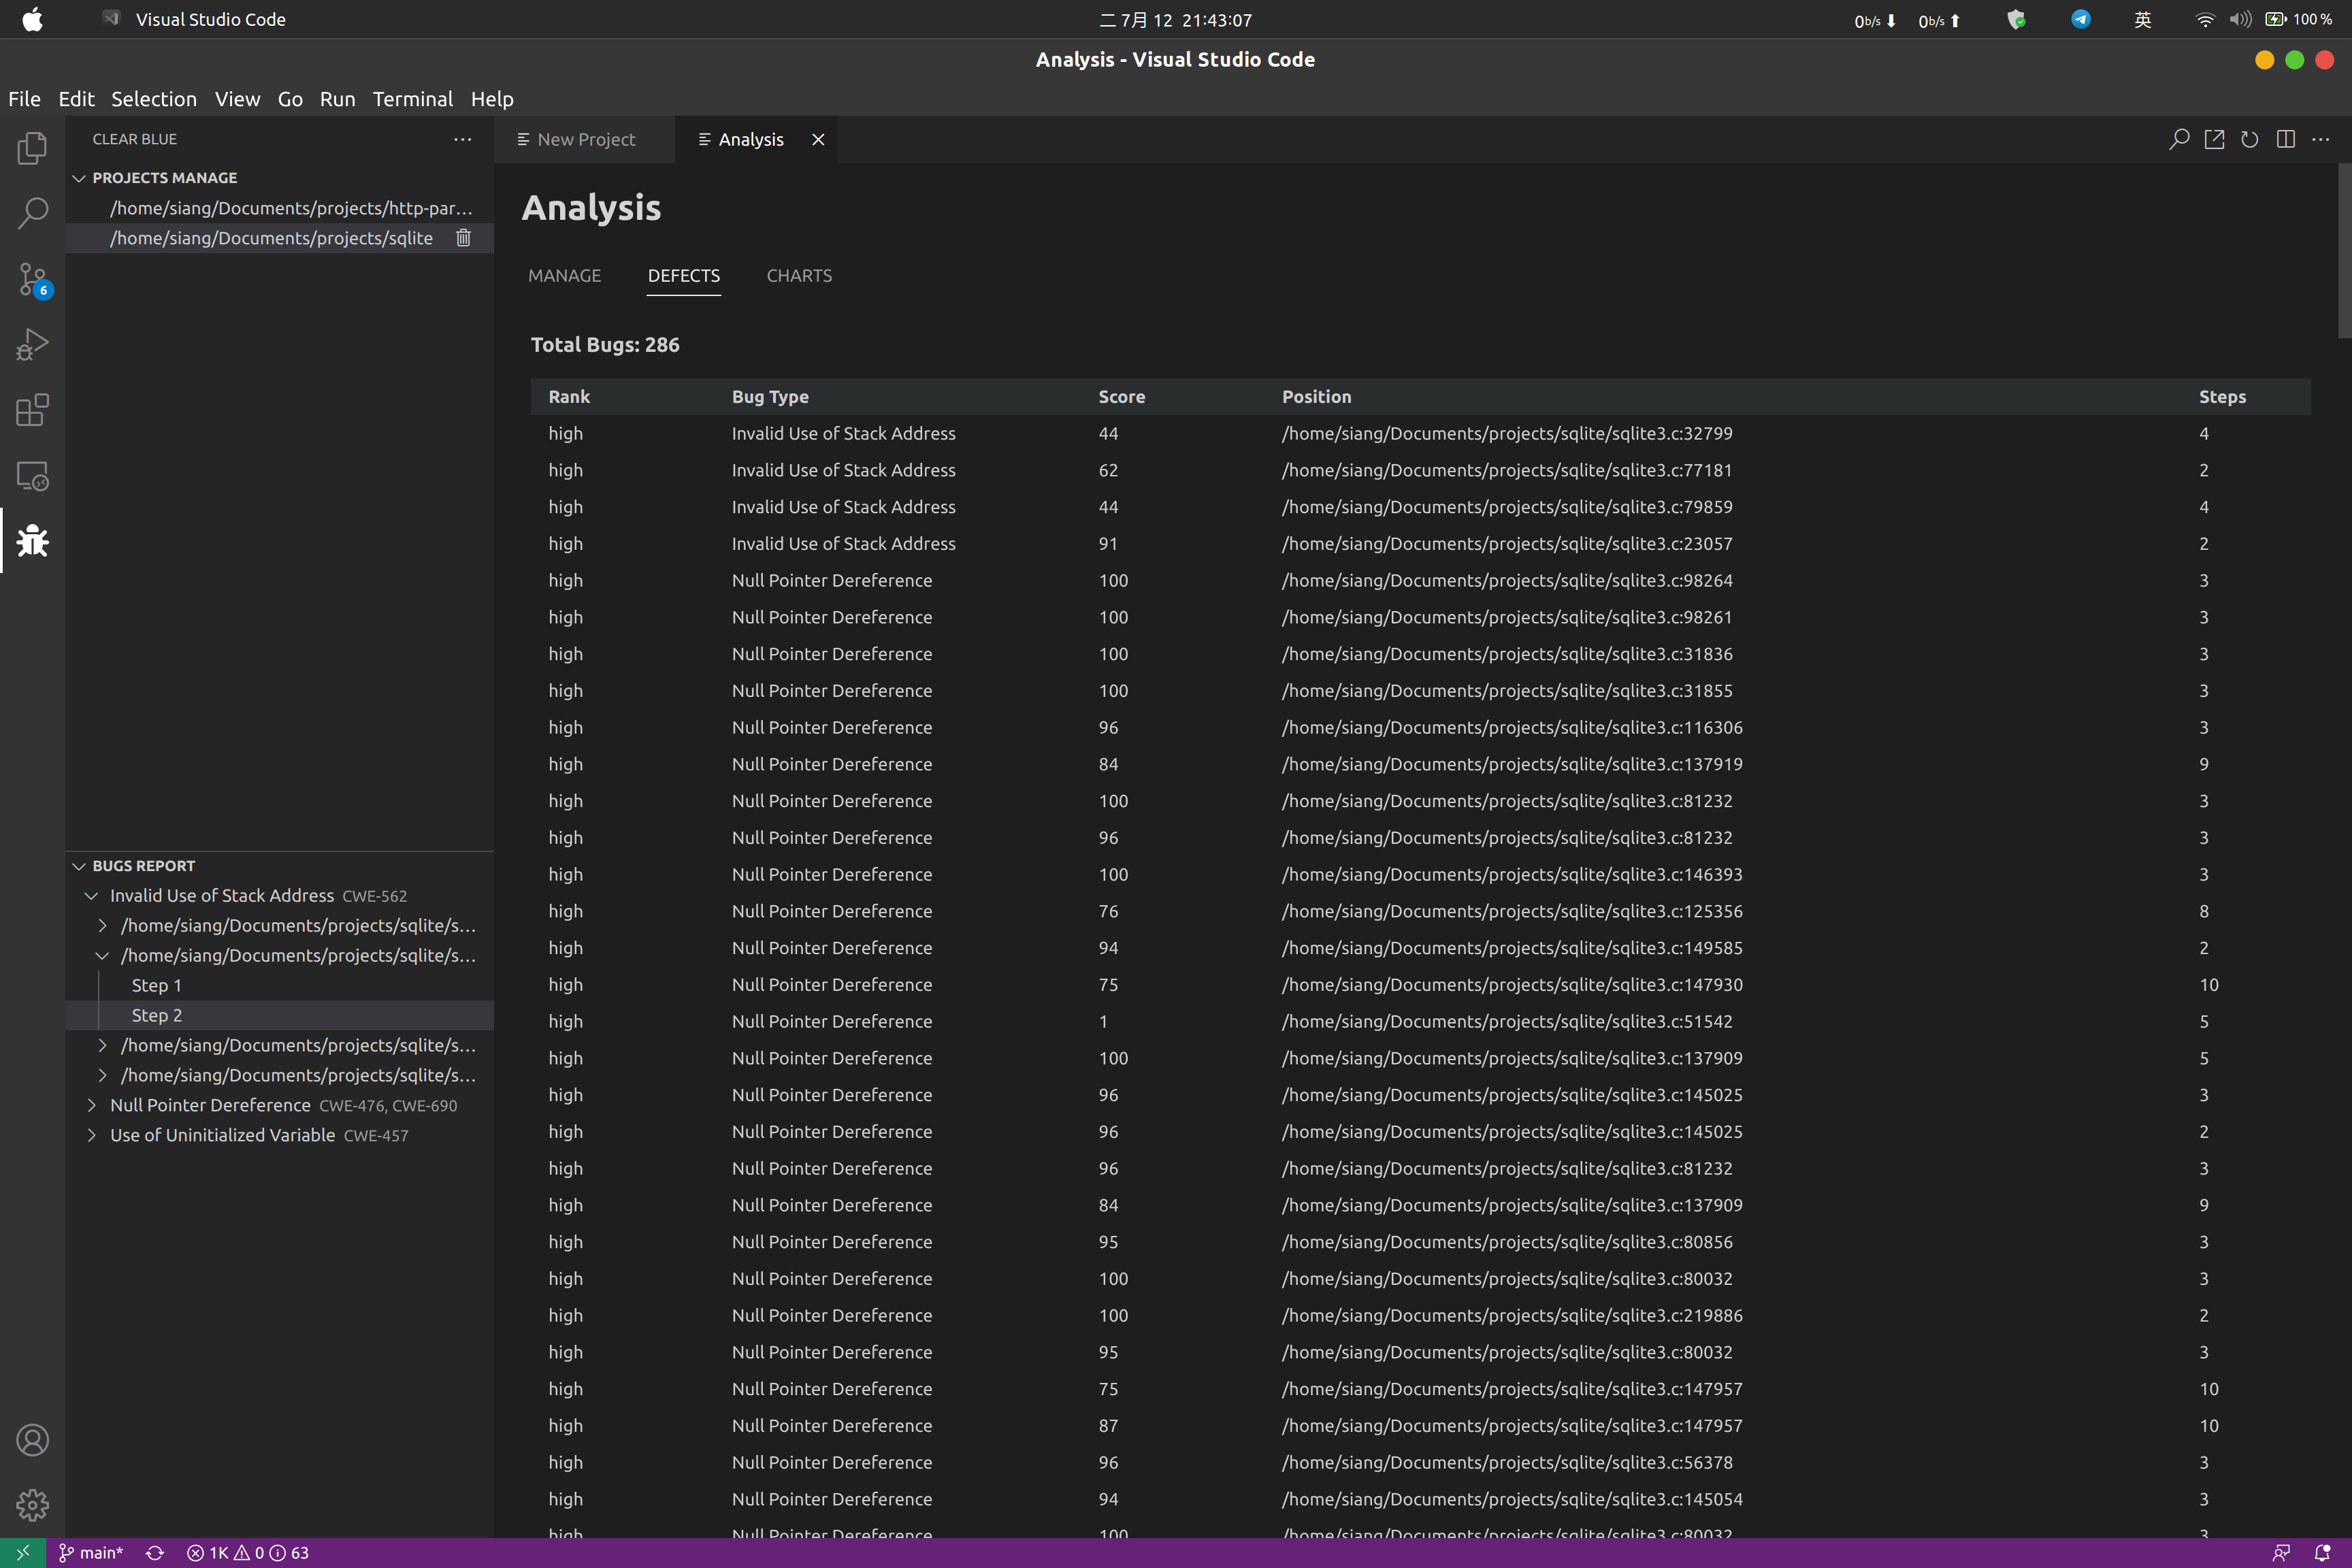
Defect Overview
To open the analysis view in Clearblue WebIDE, click on the project item and then select the DEFECT tab to display the Bugs overview. Here are some tips for using this view:
- You can click on the table header to sort the bugs based on the selected column.
- If you click on a specific POSITION in the table, you will be taken to the corresponding error location, and the bugs tree view will expand accordingly.
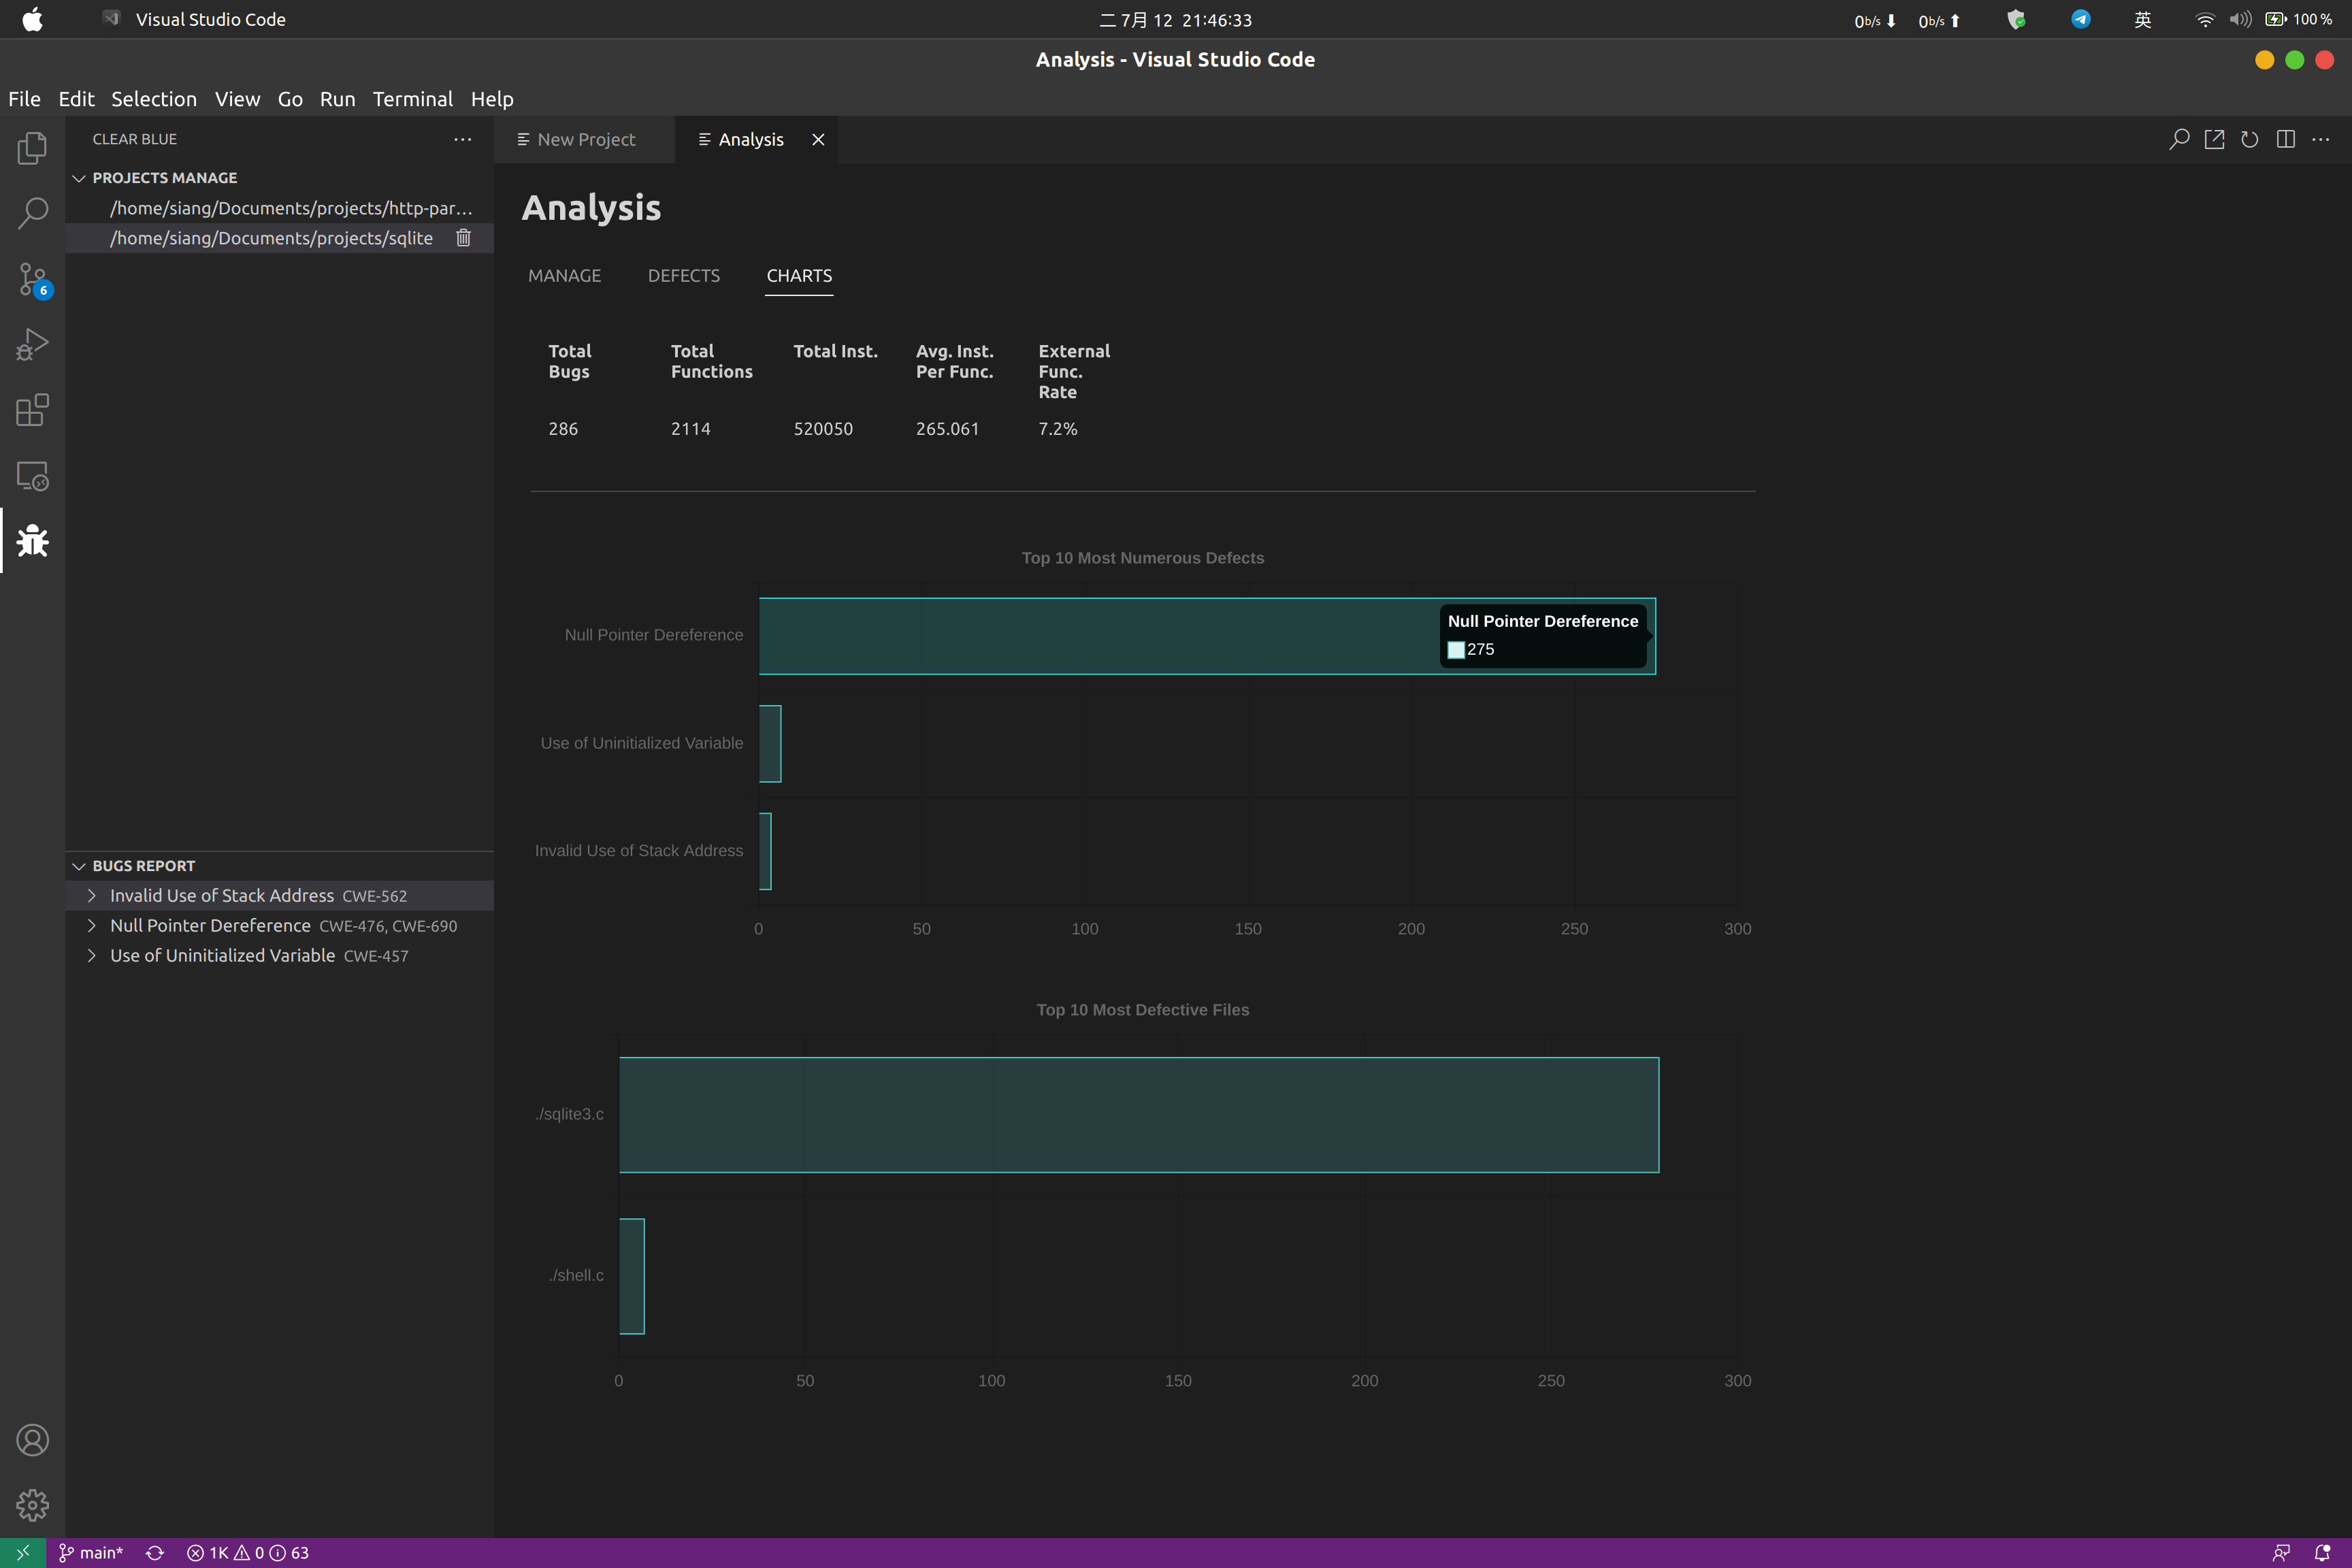
Report Charts
To open the analysis view in Clearblue WebIDE, click on the project item. You can then click on the CHARTS option to display a summary chart.
Advanced Development
Setup
This is a minimal image that has been built for the basic usage of Clearblue VSCode Extension. To develop custom checkers, please run the following command to install the required dependencies for further development:
install-dev.sh
This will also install and configure the extension for “C/C++ IntelliSense, debugging”.
To update artifacts in the container (extension, cbcheck, plankton, etc), use the following command:
update.sh
Tips for root access
This image has been built based on debian:11-slim, which means you can useaptto install any package as you like. By default, you are logged in as the normal usercoder. To gain root access, please run commands usingsudo. To gain full root access, you can switch to the root user viasudo su. However, be very careful as it may affect the outside host.
Compilation
cmake .
make -j
If everything goes well, you should see libMyChecker.so in the current directory.
Usage
To use your custom checker , select the path for Custom Checker (libMyChecker.so in this example) in Clearblue VSCode Extension, and insert the specified flag into Append Options to activate your custom checker.
For our DivideByZero example, it is registered with the following code:
static VulnerabilityRegistry<DivideByZero1>
    X("ps-dbz1", "Run path-sensitive divide-by-zero checker.", "ps-unstable");
Therefore, you should select -ps-dbz1 for the Append Options field in the extension to leverage our custom DivideByZero example.
Debugging
If no bugs are reported, it would be best for you to check the log files to make sure nothing went wrong.
Check /PATH_TO_PROJECT/.clearblue/BINARY.bc.log for extraction logs.
Check /PATH_TO_PROJECT/.clearblue/BINARY.json.log for checker logs.
If you find a bug in the extension or clearblue, please file an issue with logs attached.
Feedback
Was this page helpful?
Glad to hear it! Please tell us how we can improve.
Sorry to hear that. Please tell us how we can improve.